Navigation Bar
The Navigation Bar is located at the top side of the screen and it contains the application's main drop down menus. Items in the menus can be activated by clicking on them or by their keyboard shortcuts (see screenshots below for more info).
File Menu

The File Menu contains file (scene) handling actions.
Use the New File menu item to create a new Scene.
Once a new scene is created you'll be able to use the design tools
to create items in it. When a new scene is created, depending on the user
settings, it may be completely blank
(i.e. contain no items) or a ground item might be created by default.
The Close File menu item is only enabled when a scene is currently loaded.
Clicking the Close File menu item will close the current scene (if any).
The New File menu item will be disabled if a scene is currently active.
Similarly, the Close File menu item will be disabled if there's no active scene.
The Save File menu item can be used to save the current scene while the Load File
menu item can be used to load a previously saved scene.
Edit Menu
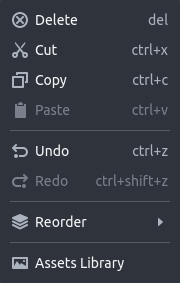
The Edit Menu contains standard actions like Delete, Cut, Copy and Paste.
These menu items will only be enabled when the current selection is not empty.
Also the standard Undo and Redo menu items are available which will undo/redo
the last user command (see Commands View).
Reorder Submenu

The Reorder Submenu contains actions for modifying the z-order of the currently selected item.
There are the following options:
Raise to Top: Moves the currently selected item to the very top.Raise: Moves the currently selected item one level up.Lower: Moves the currently selected item one level down.Lower to Bottom: Moves the currently selected item to the very bottom.
Please note that the actions that modify the z-order will only be enabled only if a single item is currently selected.
Clicking the Assets Library item of the Edit Menu, will open the assets library dialog which allows
editing of the Scene's Assets Library
View Menu

The View Menu contains the Zoom and Layout submenus.
Zoom Submenu

The Zoom Submenu contains items which allow you to change the current zoom of the scene.
You can zoom in by clicking Zoom In or zoom out by clicking Zoom Out.
Use the Reset Zoom menu item to reset the view to its initial zoom.
If you would like change the zoom so that that all items in the scene are visible then click on the Zoom Scene item.
You can also zoom the currently selected items by clicking on the Zoom Selected option.
Layout Submenu
![]()
The Layout Submenu contains items which allow you to manage the layout of the dockable
panels of the app. Use the Reset Layout option to reset the layout to
its default state. This can be used for example if you have previously closed a panel
and you want to make it visible again.
Tools Menu
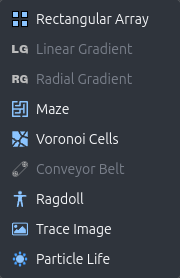
The Tools Menu provides a set of higher-level construction tools that operate on the current scene or selection. Available tools include:
| Tool | What it does |
|---|---|
| Rectangular Array | Duplicates the selected objects in a configurable grid of rows and columns. |
| Linear Gradient | Applies a linear color gradient across the selected objects. |
| Radial Gradient | Applies a radial color gradient across the selected objects. |
| Maze | Generates a randomised maze made of static walls with configurable grid size and wall thickness. |
| Voronoi Cells | Shatters the selected bodies into Voronoi cell fragments. Useful for creating breakable objects and destructible environments. |
| Conveyor Belt | Wraps a chain of linked segments around two or more selected bodies to create a conveyor belt or tank tread. |
| Ragdoll | Inserts a fully articulated ragdoll figure made of capsule or rectangle segments connected by revolute joints. |
| Trace Image | Traces the outline of an image from a URL and converts it into a polygon body. |
| Particle Life | Adds a self-contained particle-life simulation where coloured particles attract or repel each other according to configurable rules. |
The availability of each tool is dynamic and depends on the current selection. For example, Conveyor Belt requires at least two body nodes to be selected, while Ragdoll and Maze are available whenever a scene is open.
When a tool is selected from the Tools Menu, a modal dialog opens with three sections:
- Tool Description: A brief explanation of what the tool does.
- Tool Parameters: Configurable inputs for the tool (e.g. number of rows and columns for Rectangular Array, or maze dimensions for Maze).
- Errors: Validation messages shown if a parameter value is invalid.
Adjust the parameters as needed and click Execute to apply the tool.
Help Menu
