Node Scripts
A Node Script is a JavaScript class attached to a Node to give it custom behavior or functionality.
A few examples of what you can build with Node Scripts:
- Generator: Spawns clones of the attached Node at regular intervals.
- Bumper: Turns the attached Node into a pinball-style bumper that repels objects on contact.
- Destroyer: Removes any Node that touches the attached Node.
- Laser Target: Counts how many times the attached Node has been hit by a laser.
You can find more examples at Physion's assets repository.
Key points:
- A Node Script is a JavaScript class stored as a
Text/JavaScriptAsset of the Scene. - A single Node can have zero or more Node Scripts attached to it.
- Scripts define optional lifecycle methods. Only the methods you declare will be called.
- All scripts have access to the
physionglobal object, which exposes every Node class and a utility library.
Creating a Node Script
Make sure you have a Scene open before adding a script. If no Scene is open, create one via File Menu → New File.
Open the Assets Library of the Scene via Edit Menu → Assets Library.
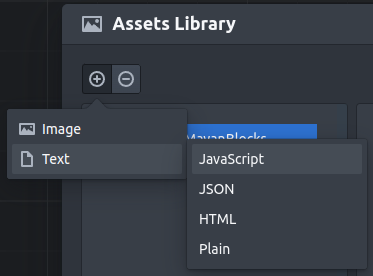
Create a new Text/JavaScript asset by clicking + → Text → JavaScript.
A new empty Text/JavaScript asset appears in your Assets Library:
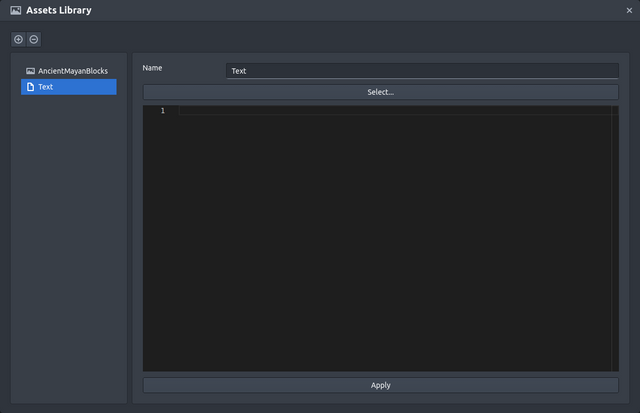
To define the script you have two options:
- Click Select... to choose from Physion's predefined script library.
- Write your own script directly in the integrated code editor.
Type the following minimal script and click Apply:
class HelloWorld {
    constructor(node) {
        node.text = "Hello World!";
    }
}
As you type, the Name field updates automatically to match your class name. It's recommended to leave this as suggested.
Click Apply to save. The script is now stored in the Scene's Assets Library but not yet attached to any Node.
Attaching a Node Script
- Select the Node using the Select Tool.
- In the Property Editor, locate the Scripts property.
- Click Edit... next to Scripts to open the Scripts Editor popover.
- At the bottom of the popover, pick a
Text/JavaScriptasset from the dropdown and click Add.
The script takes effect immediately. The popover lists every script currently attached to the Node as a collapsible row showing its name and editable parameters. Each row also has:
- A duplicate button, which attaches a second, independent instance of the same script (with the same parameter values, which you can then tweak separately).
- A remove button, which detaches that instance.
You can attach multiple scripts to a single Node, including multiple instances of the same script asset each configured differently. They run in the order they appear in the list.
Script Parameters
A Node Script can expose some of its internal values as parameters that appear directly in the Scripts Editor row for that script, editable without touching code. This is the recommended way to make a script configurable.
Declare a parameter by adding a static PD_<name> field to the class. Its shape is the same property
descriptor used throughout Physion's own Property Editor:
class Generator {
    static PD_frequency = { path: "frequency", defaultValue: 180, min: 30, step: 10 };

    constructor(node) {
        this.node = node;
        this.frequency = Generator.PD_frequency.defaultValue;
    }
}
- The field must be named
PD_<name>, andpathmust match<name>exactly. defaultValueis required; it seeds both the Scripts Editor's initial display and the value your constructor should read.min,max, andstepconstrain numeric parameters.
Use editor: "Select" with selectOptions to turn a parameter into a dropdown:
class NotePlayer {
    static PD_synthPreset = {
        path: "synthPreset",
        defaultValue: "Kalimba",
        editor: "Select",
        selectOptions: [
            { value: "Kalimba", label: "Kalimba" },
            { value: "Marimba", label: "Marimba" },
            { value: "Cello", label: "Cello" },
            // ...
        ],
    };

    constructor(node) {
        this.node = node;
        this.synthPreset = NotePlayer.PD_synthPreset.defaultValue;
    }
}
When you edit a parameter's value in the Scripts Editor, Physion assigns the new value directly onto the
already-running script instance (this.<name> = newValue); it does not re-run the constructor. For
plain fields, this just works. If your script needs to react to a parameter change, e.g. restart an
animation or recompute cached state, declare it as a getter/setter pair instead of a plain field and put
the side effect in the setter:
class PropertyAnimator {
    static PD_duration = { path: "duration", defaultValue: 3000, step: 1000 };

    constructor(node) {
        this.node = node;
        this._duration = PropertyAnimator.PD_duration.defaultValue;
    }

    get duration() { return this._duration; }
    set duration(v) {
        if (this._duration !== v) {
            this._duration = v;
            this.updateAnimation(); // react to the change
        }
    }
}
Because each attached script is its own instance, every entry in the Scripts Editor, including duplicates of the same script asset, keeps its own independent parameter values.
Lifecycle Reference
All methods are optional. Physion calls only the methods that are defined in your class.
| Method | Called when | Applies to |
|---|---|---|
constructor(node) | Script is instantiated | All nodes |
update(delta) | Every simulation step | All nodes |
destroy() | Script is replaced or node is removed | All nodes |
onSceneStarted(scene) | Simulation starts | All nodes |
onSceneStopped(scene) | Simulation stops | All nodes |
onBeginContact(other, contact) | Physics contact begins | BodyNode only |
onEndContact(other, contact) | Physics contact ends | BodyNode only |
onHitByLaser(laserNode, segment) | This node is hit by a laser | BodyNode, ParticleGroupNode |
onLaserHit(node, segment) | This laser hits another node | LaserNode only |
Method Details
constructor
When a Node Script is attached to a Node, Physion instantiates the class and passes the Node as the sole argument. Store a reference to it for use in other methods:
class MyScript {
    constructor(node) {
        this.node = node;

        this.myVar = "example";
        this.myCounter = 0;
    }
}
Every time you save changes to a script's code (or switch which asset a script entry points to), that entry's instance is destroyed and a new one is created: the constructor runs again. Other scripts attached to the same Node are unaffected. Editing a script's parameters in the Scripts Editor never recreates the instance. Keep this in mind to avoid duplicate event listeners or repeated side effects.
If your script is designed for a specific Node type, add a type-check in the constructor:
class BreakableJoint {
    constructor(node) {
        this.node = node instanceof physion.JointNode ? node : undefined;
        if (!this.node) {
            console.warn("BreakableJoint can only be attached to a JointNode");
        }
    }
}
update
Called on every simulation step. The delta argument is the time in milliseconds since the last
step. Use this method for anything that needs to run continuously during the simulation.
class ColorChanger {
    constructor(node) {
        this.node = node;
    }

    update(delta) {
        this.node.fillColor = physion.utils.randomColor();
    }
}
A time-based movement example using delta to keep speed frame-rate independent:
class Oscillator {
    constructor(node) {
        this.node = node;
        this.elapsed = 0;
        this.originX = node.x;
    }

    update(delta) {
        this.elapsed += delta;
        this.node.x = this.originX + Math.sin(this.elapsed / 500) * 2;
    }
}
destroy
Called automatically when the script is replaced (e.g. you save a new version) or the Node is removed from the Scene. Use it to clean up timers, event listeners, or any other resources your script created.
class PropertyChangeMonitor {
    constructor(node) {
        this.node = node;
        this.node.on("propertyChanged", this.onPropertyChanged);
    }

    destroy() {
        this.node.off("propertyChanged", this.onPropertyChanged);
    }

    onPropertyChanged = (name, value) => {
        console.log(`Property '${name}' changed to ${value}`);
    }
}
onSceneStarted / onSceneStopped
onSceneStarted is called when the simulation begins; onSceneStopped is called when it stops.
Both receive the Scene as their argument. Use them for per-run initialization and cleanup.
class MyScript {
    constructor(node) {
        this.node = node;
    }

    onSceneStarted(scene) {
        this.node.text = "Running…";
    }

    onSceneStopped(scene) {
        this.node.text = "Stopped.";
    }
}
onBeginContact / onEndContact
These methods only apply to BodyNode subclasses (circles, rectangles, polygons, text bodies, etc.). They are not called for non-physics nodes.
onBeginContact is called when the Node begins touching another object; onEndContact is called
when the contact ends.
Both methods receive:
- other: the other
BodyNodeinvolved in the collision. - contact: the raw
Box2D.b2Contactobject with low-level collision data.
class ContactResponder {
    constructor(node) {
        this.node = node;
    }

    onBeginContact(other, contact) {
        this.node.fillColor = 0xff0000;
    }

    onEndContact(other, contact) {
        this.node.fillColor = 0x00ff00;
    }
}
The Box2D engine is still mid-step when these callbacks fire. Adding or removing bodies at this point
can cause crashes or unstable behavior. Instead, queue the work and process it in update:
class Destroyer {
    constructor(node) {
        this.node = node;
        this.destroyQueue = new Set();
    }

    update(delta) {
        for (let bodyNode of this.destroyQueue) {
            if (bodyNode.parent) {
                bodyNode.parent.removeChild(bodyNode);
                this.destroyQueue.delete(bodyNode);
            }
        }
    }

    onBeginContact(bodyNode, contact) {
        if (contact.IsTouching()) {
            this.destroyQueue.add(bodyNode);
        }
    }
}
onHitByLaser
This method applies to BodyNode and ParticleGroupNode (the node being struck by the laser).
Called each time a laser beam from a LaserNode strikes this Node. Useful for targets, sensors,
and destructible objects.
Parameters:
- laserNode: the
LaserNodethat fired the beam. - segment: details about the hit:
p1: start point of the laser segmentp2: end point (the hit point on this node)length: length of this segmentbounceIndex:0for the initial cast,1+for each reflectionresult: raycast result with hit point, normal, fixture, and more
class LaserTarget {
    constructor(node) {
        this.node = node;
        this.hitCount = 0;
    }

    onHitByLaser(laserNode, segment) {
        this.hitCount++;

        if ("text" in this.node) {
            this.node.text = this.hitCount.toString();
        }
    }
}
onLaserHit
This method applies to LaserNode only (the node that is emitting the laser).
The counterpart to onHitByLaser: called on the LaserNode whenever its beam strikes another object.
Useful for laser behaviors that depend on what is being hit.
Parameters:
- node: the
BodyNodeorParticleGroupNodethat was hit. - segment: same structure as in
onHitByLaser.
class ColorChangingLaser {
    constructor(node) {
        this.node = node;
    }

    onLaserHit(other, segment) {
        if ("fillColor" in other) {
            other.fillColor = physion.utils.randomColor();
        }
    }
}
The physion Global
All scripts have access to the physion global object, which is the primary API for scripting in Physion.
Node classes
Every Node class is available as physion.<ClassName>, making it easy to perform instanceof checks or construct new nodes:
| Class | Description |
|---|---|
physion.Node | Base class for all nodes |
physion.Scene | The scene container |
physion.BodyNode | Base class for physics bodies |
physion.CircleNode | Circle physics body |
physion.RectangleNode | Rectangle physics body |
physion.CapsuleNode | Capsule physics body |
physion.PolygonNode | Custom polygon physics body |
physion.RegularPolygonNode | Regular polygon physics body |
physion.TextNode | Text rendered as a physics body |
physion.SpriteNode | Image sprite |
physion.AnimatedSpriteNode | Animated sprite |
physion.LaserNode | Laser raycast emitter |
physion.JointNode | Base class for joints |
physion.RevoluteJointNode | Rotational joint |
physion.DistanceJointNode | Fixed-distance joint |
physion.WeldJointNode | Rigid connection joint |
physion.WheelJointNode | Wheel/suspension joint |
physion.SpringNode | Spring constraint |
physion.ParticleGroupNode | LiquidFun particle group |
physion.ParticleEmitterNode | Particle emitter |
physion.TracerNode | Traces a body's movement path |
physion.GraphNode | Graph/chart display |
physion.utils
physion.utils is a library of utility functions for common scripting tasks. A selection of frequently used functions:
Math
| Function | Description |
|---|---|
randomNumber(min, max) | Random number in the given range |
clamp(value, min, max) | Restrict a value to a range |
lerp(a, b, t) | Linear interpolation between two numbers |
lerpPoint(a, b, t) | Linear interpolation between two points |
calculateDistance(p1, p2) | Euclidean distance between two points |
calculateAngle(p1, p2) | Angle in radians from p1 to p2 |
radToDeg(rad) | Radians → degrees |
degToRad(deg) | Degrees → radians |
midPoint(p1, p2) | Midpoint between two points |
Color
| Function | Description |
|---|---|
randomColor() | Random hex color number |
darkenColor(color, amount) | Darken a color by a percentage |
lightenColor(color, amount) | Lighten a color by a percentage |
toHexString(color) | Convert a color number to "#rrggbb" |
fromHexString(hex) | Convert "#rrggbb" to a color number |
Nodes
| Function | Description |
|---|---|
cloneNode(node) | Shallow-clone a node |
cloneNodeDeep(node) | Deep-clone a node and its children |
filteredNodes(nodes, Class) | Filter an array of nodes by class |
getJointNodesOf(bodyNode) | Get all joints connected to a body |
createRope(p1, p2, segmentSize, ...) | Build a rope of connected bodies |
Geometry
| Function | Description |
|---|---|
rotatePoint(p, center, angle) | Rotate a point around a center |
createRegularPolygon(x, y, r, sides, rotation) | Generate a regular polygon's points |
physion.root
physion.root gives advanced scripts access to the application controller, including sceneController
and commandManager. This is an escape hatch for power users; most scripts won't need it.
Node Types & Properties
The properties available to a script depend on the Node type. All values are readable and writable unless noted.
All nodes
| Property | Type | Description |
|---|---|---|
x | number | X position in scene units (meters) |
y | number | Y position in scene units (meters) |
angle | number | Rotation in degrees |
alpha | number | Opacity (0 – 1) |
name | string | Display name |
id | string | Unique identifier (read-only) |
userData | object | Free-form data storage |
parent | Node | Parent node (read-only) |
children | Node[] | Child nodes (read-only) |
Key methods: addChild(node), removeChild(node), findChildByName(name), getDescendants().
GraphicsNode (shapes, sprites, text)
Adds visual properties:
| Property | Type | Description |
|---|---|---|
fillColor | number | Fill color as a hex number (e.g. 0xff0000) |
fillAlpha | number | Fill opacity (0 – 1) |
fillTexture | string | Image asset ID for texture fill |
lineColor | number | Stroke color |
lineAlpha | number | Stroke opacity |
lineWidth | number | Stroke width |
blendMode | number | PIXI blend mode |
BodyNode (physics bodies)
Adds physics properties:
| Property | Type | Description |
|---|---|---|
bodyType | string | "static", "kinematic", or "dynamic" |
linearVelocityX | number | Horizontal velocity |
linearVelocityY | number | Vertical velocity |
linearVelocity | {x, y} | Velocity vector (read-only) |
angularVelocity | number | Rotational velocity |
linearDamping | number | Velocity damping |
angularDamping | number | Rotational damping |
friction | number | Surface friction (0 – 1) |
restitution | number | Bounciness (0 – 1) |
density | number | Mass per area |
mass | number | Computed mass (read-only) |
gravityScale | number | Scale factor on gravity |
sensor | boolean | Detect collisions without physical response |
active | boolean | Enable/disable the body |
fixedRotation | boolean | Prevent rotation |
bullet | boolean | Enable continuous collision (fast-moving objects) |
LaserNode
| Property | Type | Description |
|---|---|---|
powered | boolean | Turn the laser on/off |
color | number | Laser beam color |
size | number | Beam thickness |
maxDistance | number | Maximum beam length |
maxBounces | number | Number of reflections allowed |
fadeWithDistance | boolean | Fade the beam over distance |
JointNode
| Property | Type | Description |
|---|---|---|
bodyNodeAid | string | ID of the first connected body |
bodyNodeBid | string | ID of the second connected body |
anchorA | {x, y} | Anchor point on body A (local coords) |
anchorB | {x, y} | Anchor point on body B (local coords) |
Multiple Scripts on One Node
You can attach any number of scripts to a single Node. Physion calls each script's methods in the order they were attached.
Sharing state between scripts
Scripts on the same Node can share state through node.userData:
// Script A: writes to userData
class ScriptA {
    constructor(node) {
        this.node = node;
        node.userData.score = 0;
    }

    onBeginContact(other, contact) {
        this.node.userData.score += 1;
    }
}

// Script B: reads from userData
class ScriptB {
    constructor(node) {
        this.node = node;
    }

    update(delta) {
        if ("text" in this.node) {
            this.node.text = String(this.node.userData.score ?? 0);
        }
    }
}
Configuring a script differently per attachment
To use the same script class with different configuration, whether on different Nodes or attached more
than once to the same Node, don't reach for userData: declare the configurable values as
Script Parameters instead. Each attached instance keeps its own parameter values,
editable directly in the Scripts Editor, with no extra wiring required.
Best Practices
Always store the node reference in the constructor. Other lifecycle methods have no other way to access it.
Type-check when your script targets a specific node type.
Using instanceof physion.JointNode (or whichever type) in the constructor prevents silent failures
when a script is accidentally attached to the wrong node.
Keep update lean.
It runs every simulation step. Avoid allocating objects or doing heavy computation inside it.
Never modify the physics world during contact callbacks.
Queue removals or property changes in a Set and process them in update.
See the Destroyer example above.
Clean up in destroy.
If your script registers event listeners, clear them in destroy to prevent leaks and phantom
behavior when the script is replaced.
Use node.userData for cross-script communication.
It's the intended shared data store between multiple scripts on the same Node.
Use PD_ static properties for user-configurable values.
They show up as editable fields in the Scripts Editor and keep independent values per attached instance.
Reserve userData for cross-script communication or internal state that shouldn't be user-editable.
Beware of the ephemeral nature.
Every time you save an edit to a script's code (or swap its asset), that entry's constructor runs again.
Avoid side effects in the constructor that should happen only once (e.g. adding children), or guard them
with a check on node.userData. Editing a script's parameters does not trigger this; use a getter/setter
if you need to react to a parameter change instead.